目錄
- 1.celery異步消息隊列介紹
- celery應用舉例
- Celery有以下優點
- Celery 特性
- 2.工作原理 *****
- 3.異步發短信
- 3.1.settings同級目錄下創建 celery 文件
- 3.2.redis及容聯云配置
- 3.3.配置settings文件
- 3.4.配置 settings同級目錄下 init 文件
- 3.5.在utils下新建一個task.py文件
- 3.6.接口中調用
- 3.7.先啟動django項目
1.celery異步消息隊列介紹
celery應用舉例
- Celery 是一個 基于python開發的分布式異步消息任務隊列,通過它可以輕松的實現任務的異步處理,如果你的業務場景中需要用到異步任務,就可以考慮使用celery
- 你想對100臺機器執行一條批量命令,可能會花很長時間 ,但你不想讓你的程序等著結果返回,而是給你返回 一個任務ID,你過一段時間只需要拿著這個任務id就可以拿到任務執行結果, 在任務執行ing進行時,你可以繼續做其它的事情
- Celery 在執行任務時需要通過一個消息中間件來接收和發送任務消息,以及存儲任務結果, 一般使用rabbitMQ or Redis
Celery有以下優點
- 簡單:一單熟悉了celery的工作流程后,配置和使用還是比較簡單的
- 高可用:當任務執行失敗或執行過程中發生連接中斷,celery 會自動嘗試重新執行任務
- 快速:一個單進程的celery每分鐘可處理上百萬個任務
- 靈活: 幾乎celery的各個組件都可以被擴展及自定制
Celery 特性
- 方便查看定時任務的執行情況, 如 是否成功, 當前狀態, 執行任務花費的時間等.
- 可選 多進程, Eventlet 和 Gevent 三種模型并發執行.
- Celery 是語言無關的.它提供了python 等常見語言的接口支持.
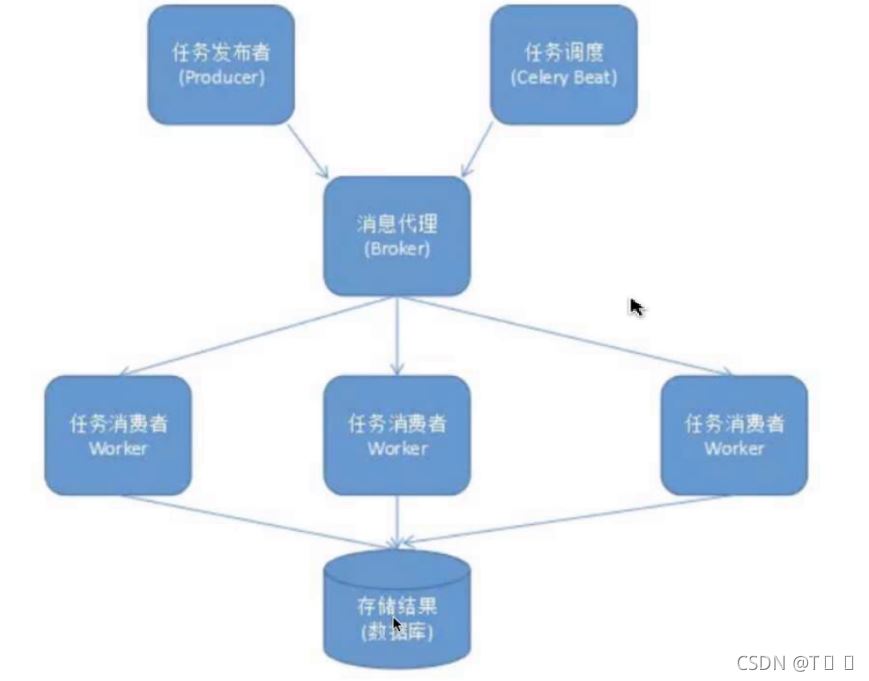
2.工作原理 *****
Celery 扮演生產者和消費者的角色
- Celery Beat : 任務調度器. Beat 進程會讀取配置文件的內容, 周期性的將配置中到期需要執行的任務發送給任務隊列.
- Celery Worker : 執行任務的消費者, 通常會在多臺服務器運行多個消費者, 提高運行效率.
- Broker : 消息代理, 隊列本身. 也稱為消息中間件. 接受任務生產者發送過來的任務消息, 存進隊列再按序分發給任務消費方(通常是消息隊列或者數據庫).
- Producer : 任務生產者. 調用 Celery API , 函數或者裝飾器, 而產生任務并交給任務隊列處理的都是任務生產者.
- Result Backend : 任務處理完成之后保存狀態信息和結果, 以供查詢.
思維導圖
3.異步發短信
首先得安裝倆個表要包
pip install celery
pip install celery-with-redis
3.1.settings同級目錄下創建 celery 文件
如果 'namespace=‘CELERY''出現報錯 celery可以適當降一下級別 ‘4.4.7'
from __future__ import absolute_import, unicode_literals
import os
from celery import Celery


# 設置環境變量
os.environ.setdefault('DJANGO_SETTINGS_MODULE', 'md.settings')

# 注冊Celery的APP
app = Celery('meiduo')
# 綁定配置文件
app.config_from_object('django.conf:settings', namespace='CELERY')

# 自動發現各個app下的tasks.py文件
# app.autodiscover_tasks()
3.2.redis及容聯云配置
#獲取redis連接
def getRedis():
    from django_redis import get_redis_connection
    conn = get_redis_connection()
    return conn

#發短信  去容聯云官網查找自己的信息
from ronglian_sms_sdk import SmsSDK

accId = 'ACCOUNT SID(主賬號ID)'
accToken = 'AUTH TOKEN(賬戶授權令牌)'
appId = 'AppID(默認)'

import json
def send_message(mobile,code,time):
    sdk = SmsSDK(accId, accToken, appId)
    tid = '1'
    datas = (code, time)
    resp = sdk.sendMessage(tid, mobile, datas)
    result = json.loads(resp)
    if result['statusCode'] == '000000':
        return 1
    return 2
3.3.配置settings文件
CELERY_BROKER_URL = 'redis://127.0.0.1:6379/'

CELERY_RESULT_BACKEND = 'redis://127.0.0.1:6379/'

CELERY_RESULT_SERIALIZER = 'json'
3.4.配置 settings同級目錄下 init 文件
from __future__ import absolute_import, unicode_literals
from .celery import app as celery_app

__all__ = ['celery_app']
3.5.在utils下新建一個task.py文件
# 寫異步任務的地方
from celery.task import task
from .comm import send_message

# 定義發送手機號的方法
@task
def mail(mobile,code,time):
    send_message(mobile,code,time)
3.6.接口中調用
如果用了redis數據庫,得先開啟數據庫
from utils.task import send_message
from utils.comm import getRedis
import random

class SendMes(APIView):
    # 短信驗證
    def get(self,request):
        # 接收客戶端發送的數據
        imagecode = request.query_params.get('imagecode')
        print(imagecode)
        mobile = request.query_params.get('mobile')
        print(mobile)
        uuid = request.query_params.get('uuid')
        print(uuid)
        if not all([imagecode,mobile]):
            return Response({'msg':'沒有獲取到'})
        # 驗證圖片驗證碼
        conn =getRedis()
        # redis 中取驗證碼
        code = conn.get(uuid)
        print(code)
        if code:
            code = str(code,encoding='utf8')
            # 圖片驗證碼對比
            if imagecode.lower() == code.lower():
                # 驗證通過后調用發送短信接口
                sms_code = random.randint(10000,99999)
                # 引用comm文件中的send_message
                result = send_message(mobile,sms_code,1)
               # 加入短信嗎發送成功
                if result:
                    # redis中要存短信驗證嗎
                    conn.setex(mobile,60,sms_code)
                    # 把圖片驗證碼從redis中刪除
                    conn.delete(uuid)
                    return Response({'msg':sms_code})
                else:
                    return ({'msg':'發送失敗'})
            else:
                return Response({'msg':'驗證碼不正確'})
        return Response('ok')
3.7.先啟動django項目
然后另開終端 cd到項目 目錄下啟動celery 服務
指定并發數 --autoscale(最多,最少)
celery worker -A 項目的文件名 --loglevel=info --pool=solo --autoscale=50,5
urn Response('ok')
~~~

#### 3.7.先啟動django項目 然后另開終端 cd到項目 目錄下啟動celery 服務

指定并發數 --autoscale(最多,最少)

```pyhon
celery worker -A 項目的文件名 --loglevel=info --pool=solo --autoscale=50,5
到此這篇關于使用Celery 容聯云 異步發送驗證碼的文章就介紹到這了,更多相關Celery異步發送驗證碼內容請搜索腳本之家以前的文章或繼續瀏覽下面的相關文章希望大家以后多多支持腳本之家!
您可能感興趣的文章:- python基于celery實現異步任務周期任務定時任務
- Python Celery多隊列配置代碼實例
- Python并行分布式框架Celery詳解
- python Celery定時任務的示例
- Python環境下安裝使用異步任務隊列包Celery的基礎教程
- 在RedHat系Linux上部署Python的Celery框架的教程